TWS: pairing two units
JP150PCB 1.3PCB 1.4since 26.9.0Jan PřibyslavskýThis page does not apply to the product or PCB revision chosen in the header.
The recommended procedure for two units that have no TWS peer in their peer memory, such as new units. The controls are described on TWS: controls in MuraLink.
Before you start
Switch off Bluetooth on the host, or make sure that the host is not connected to either unit. A unit cannot start TWS pairing while a host is connected to it. You connect the host at the end of the procedure.
Step 1: set up unit A as Primary
- Connect to unit A. Switch it on, connect its USB DATA connector to the PC, start MuraLink, select the unit's COM port, and click Connect.
- Check the input. On the Overview tab, make sure that the Bluetooth input is selected. The unit plays Bluetooth audio only when its input is set to Bluetooth.
- Open the TWS section. Open Bluetooth > TWS in the sidebar.
- Enable TWS. Under TWS capability, check that Enable is selected. If Disable is selected, click Enable.
- Set the role. Under Fallback role, click Primary. If the Change TWS fallback role dialog opens, click OK. If Primary is already selected (the factory default), nothing happens; continue with the next step.
- Start pairing. In the Remembered devices section, click Start new pairing and confirm with OK. This clears any TWS peer left over from earlier use, and the unit starts searching as Primary. Wait until the message "The Bluetooth module is restarting…" disappears.
- Check the peer list. The Peer table must not contain a row marked TWS, and Paired peer must show n/a.
- Disconnect MuraLink. Click Disconnect at the top of the MuraLink window (not the Disconnect button in the Remembered devices section) and unplug the USB cable. Leave unit A switched on.
Step 2: set up unit B as Secondary
Important
New units are set to Primary by default. One of the two units must be set to Secondary: two Primary units both search for a peer and never find each other.
- Connect to unit B. Switch it on, connect its USB DATA connector to the PC, select the unit's COM port in MuraLink, and click Connect.
- Check the input. On the Overview tab, select the Bluetooth input.
- Enable TWS. On the Bluetooth > TWS page, make sure that Enable is selected under TWS capability.
- Set the role. Under Fallback role, click Secondary, and then click OK in the dialog.
- Start pairing. In the Remembered devices section, click Start new pairing and confirm with OK. Wait until the restart notice disappears.
- Check the peer list. The Peer table must not contain a row marked TWS, unless the units have already paired (see the note below).
Note
If unit A is still switched on, it is already searching for a peer, so the two units usually pair on their own within a few seconds after step 5. A row marked TWS then appears in the Peer table. In that case, skip Step 3 and check the result as described in Step 4.
Step 3: let the units find each other
The most reliable way to pair the units is to restart them in the following order:
- Switch off both units.
- Switch on unit B (Secondary).
- A few seconds later, switch on unit A (Primary).
Unit B waits for a peer, unit A searches for and finds unit B, and the pairing is stored on both units. This usually takes a few seconds, but can take up to about 30 seconds.
Switching on both units at the same time also works. Alternatively, with both units switched on, run Start new pairing on unit B first and then on unit A: unit A starts searching immediately, while unit B is already waiting.
Step 4: check the result
Connect MuraLink to either unit and open the Bluetooth > TWS page. You should see the following:
| Field | Unit A | Unit B |
|---|---|---|
| TWS status | Connected (or Streaming while audio is playing) | Connected (or Streaming) |
| Current role | Primary | Secondary |
| Paired peer | the Bluetooth address of unit B | the Bluetooth address of unit A |
| Peer table | a row marked TWS | a row marked TWS |
If this is what you see, pairing is complete and stored on both units. You do not need to pair these units again.
Checking the pair without a PC: status LED
When a unit's input is set to Bluetooth, its status LED also indicates TWS activity. The pattern always includes blue. The second colour depends on the unit's Fallback role: green for Primary, purple-red for Secondary.
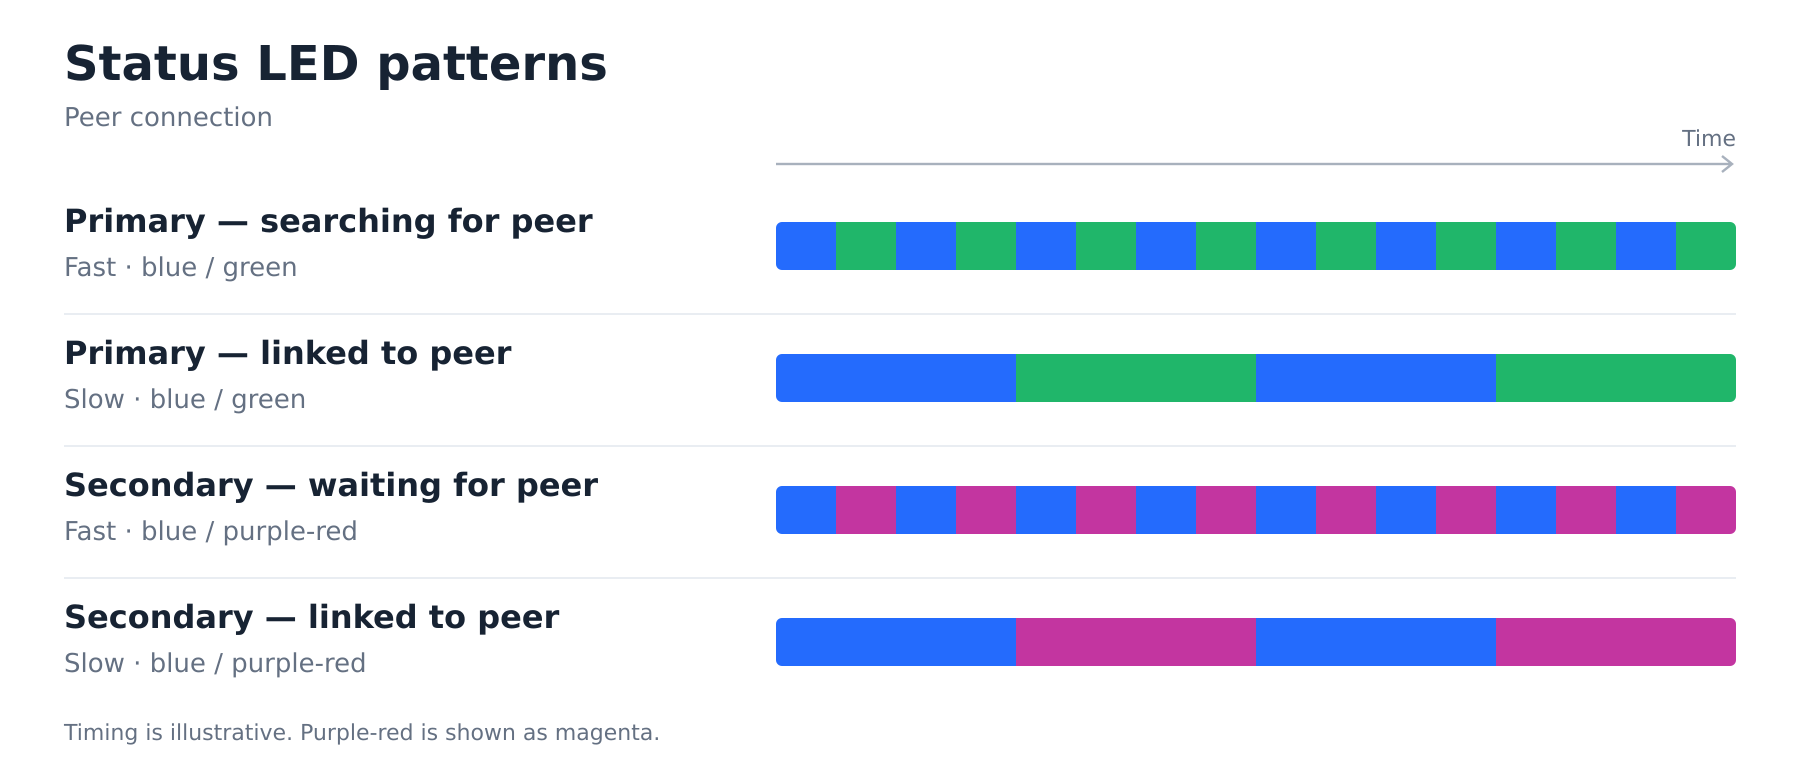
While a host is connected but the TWS link is not yet established, the LED shows the standard Bluetooth patterns instead: solid blue when connected and idle, and a slow blue heartbeat while audio is playing. A slow, hard blue blink means that the Bluetooth module is not responding. The complete table is on LED reference.
Connecting the Bluetooth host
- Enable Bluetooth on the host.
- Pair the host with the Primary unit (unit A). The unit appears under its Bluetooth name, which MuraLink shows as Device Name in the Diagnostics group.
- Start playback on the host. Both units play the audio.
Always connect the host to the Primary. The Secondary receives its audio from the Primary, not from the host, and should not appear on the host as a device available for connection.
Tip
To give the units recognisable Bluetooth names, use Change name on Bluetooth > Status. Use only unaccented letters (A to Z), digits and spaces.